Managing your business's schedule in Trafft involves several key components: Working Hours, Days Off, Special Days, and Office Hours. Let's explore these essential segments to help you create an effective working schedule.
Let's dive into each of these components
Availability of Time Slots (Services)
The availability of services within Trafft is directly tied to the Working Hours, Days Off, and Special Days configured for your employees. Here's how it works:
- If your employees have set Working Hours from Monday to Friday, 09:00 to 17:00, all services assigned to these employees will be available for appointments during these times. This availability is determined by the duration of each service.
- To customize service availability based on an employee's specific working hours, you can create multiple working periods in the employee's profile. For example:
- Employee A covers Service 1 from 09:00 to 12:00.
- Employee A also covers Service 2 from 13:00 to 15:00.
In this scenario, you would create two distinct working periods for Employee A:
- Working Period 1: 09:00 - 12:00, assigned to Service 1
- Working Period 2: 13:00 - 15:00, assigned to Service 2
This allows you to manually select the services offered during each working period, providing flexibility and control over service availability throughout the day.
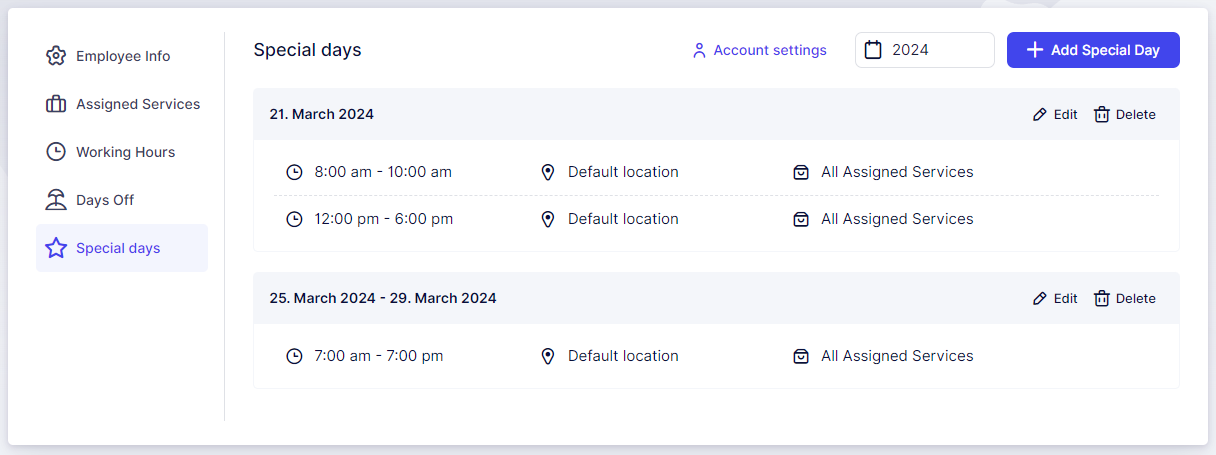
Special Days in Trafft offer a way to override regular working hours. For example, if your employee typically works from 09:00 to 17:00, you can create a Special Day for a specific date or date range. During this Special Day, you can set unique working hours that will override the employee's regular schedule. This feature allows for flexibility in scheduling, accommodating events, holidays, or temporary changes in working hours.
Days Off in Trafft are used to block entire days for employees. This feature is handy for managing vacations, sick leaves, or any other personal time off. When a day is marked as a Day Off for an employee, it ensures that no appointments can be booked on that day. This helps in organizing employee schedules and preventing any conflicts with their time off.
Working Hours
Working Hours are specific to each employee. You can set unique working hours for each employee based on their schedule. For instance, John's working hours might be 09:00 - 17:00, while Mark's could be 12:00 - 20:00. These hours are applied to weekdays (Monday to Sunday) and are automatically repeated every week.

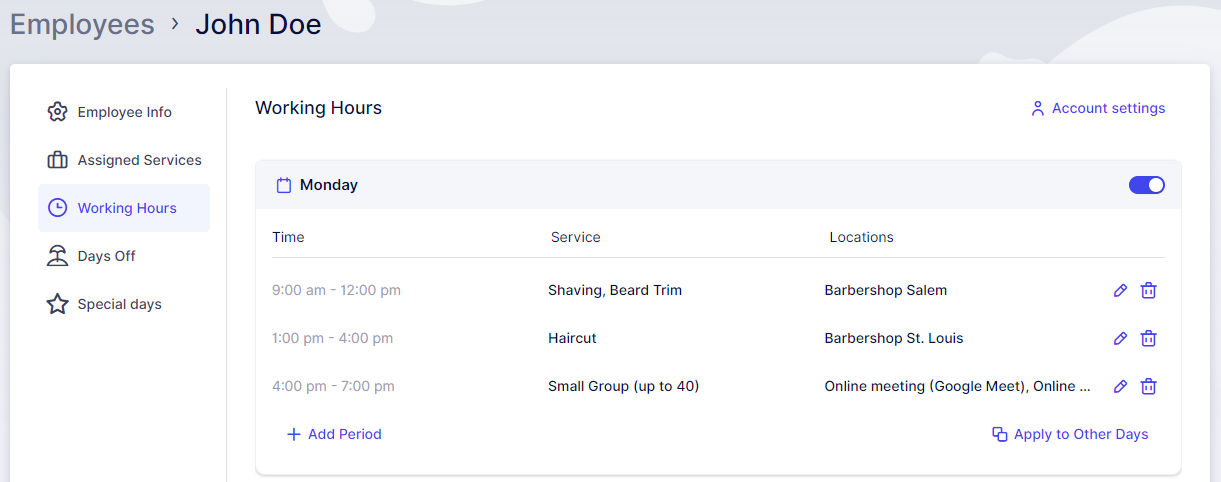
In the example above, the employee is scheduled for "Shaving" and "Beard Trim" services from 09:00 to 12:00 at the "Barbershop Salem" location. Following a 1-hour gap (allowing time for travel), the next period starts at 13:00 and ends at 16:00 at the "Barbershop St. Louis" location, where the employee provides the "Haircut" service exclusively. The third period, starting with the end of the second, represents a scenario where John Doe is hosting a "Small Group (up to 40)" lecture, which is conducted via Online locations (Google Meet, Zoom, or Microsoft Teams).
Although the employee's Default Location is set to "Barbershop St. Louis" in the "Employee Info" tab, this has been overridden in the working hours for specific services.
If you leave the "Default Location" and the "Assigned Services" in the working periods, the employee will cover all assigned services only at the Default location. The example illustrates how you can customize an employee's working hours based on location and assigned services.
As mentioned earlier, the Working Hours set for an employee will repeat every week, based on the defined schedule. Using the example from the screenshot, every Monday in the employee's schedule would follow this configuration.
It's important to understand that the services and/or locations specified in Working Hours Periods cannot be changed automatically if new or different services are assigned to the employee in the Assigned Services tab. For instance, if the "Beard Trim" is defined in a working period, only this service will be covered during that time. If a new service needs to be included alongside "Beard Trim", it must also be added to the respective Working Hours period.
Furthermore, if you want the employee to cover all assigned services, it's recommended not to select specific services when creating Working Hours periods. Leaving the service selection blank will automatically include All Assigned Services, ensuring that any new services added will also be covered during the defined Working Hours.
Special Days
Let's consider a scenario where your employee needs to attend a seminar from November 6th to November 10th. During this period, the employee will be available for bookings but only until noon.
To proactively manage this situation without risking advanced bookings, you can utilize the Special Days feature. Begin by accessing the employee's profile and navigating to the "Special Days" tab, which is automatically enabled during your free trial.
Click on the "+ Add Special Day" button to bring up a new popup window. Here, you can specify either a range of dates or a single date to mark as a Special Day.
For detailed instructions on creating Special Days, please refer to this guide.

Days Off
The Days Off feature in Trafft takes precedence over Working Hours and Special Days, allowing you to mark specific dates when employees are not supposed to work at all.
Days Off can be added either directly in an employee's profile or in Settings -> Company Days Off. The distinction lies in their scope: Company Days Off apply to all employees, while Days Off specified within an employee's profile pertains only to that particular employee's schedule.
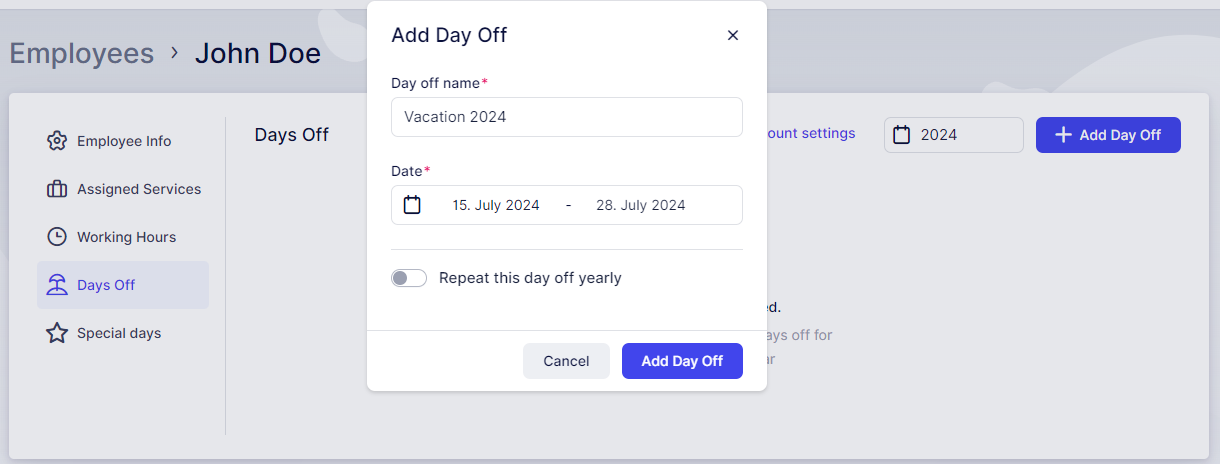
For instance, if an employee has a scheduled vacation from July 15th to July 28th, you can easily set this up by accessing the Days Off section in the Employee's Profile. Simply click on "+ Add Day Off", enter the event name ("Vacation 2024", for example), and select the date range. You can also double-click to choose a single date, which is useful for things like sick days.
Additionally, there's a convenient slider option that allows you to repeat the day off every year. This is handy for recurring events like employee birthdays. By selecting a single date and enabling the "Repeat this day off yearly" slider, Trafft will automatically mark this day off in the future, saving you time and hassle.

Calendar Integrations
The final factor that influences your employees' schedules is the Calendar integrations:
Each of these integrations includes the "Remove calendar busy slots" option within its configuration settings.
For example, in Google Calendar Integration page, you'll find this:

Once your employees are connected to their calendars, this option checks for existing busy slots in the connected calendars and removes availability during these events in the employee's schedule.
For instance, if your employee works from 09:00 - 12:00 with no other appointments, special days, or days off configured, but has a busy event from 10:00 - 12:00 created in the Google Calendar they're connected to, this time will be blocked for booking in Trafft if the "Remove calendar busy slots" option is enabled, or if the calendar from which the event is pulled is assigned to the employee under Account Settings.
All events coming from the calendars (both free and busy) can be seen in the Calendar section in Trafft.
Have more questions
If you face an issue, and cannot find an answer in the documentation, feel free to submit a support ticket!
Contact us

