General Settings are designed to allow you to configure fundamental settings that will be applied throughout the entire application. Currently, these settings are divided into two main sections:
To access them, click on the “Settings” icon in the bottom left corner of your Admin section.
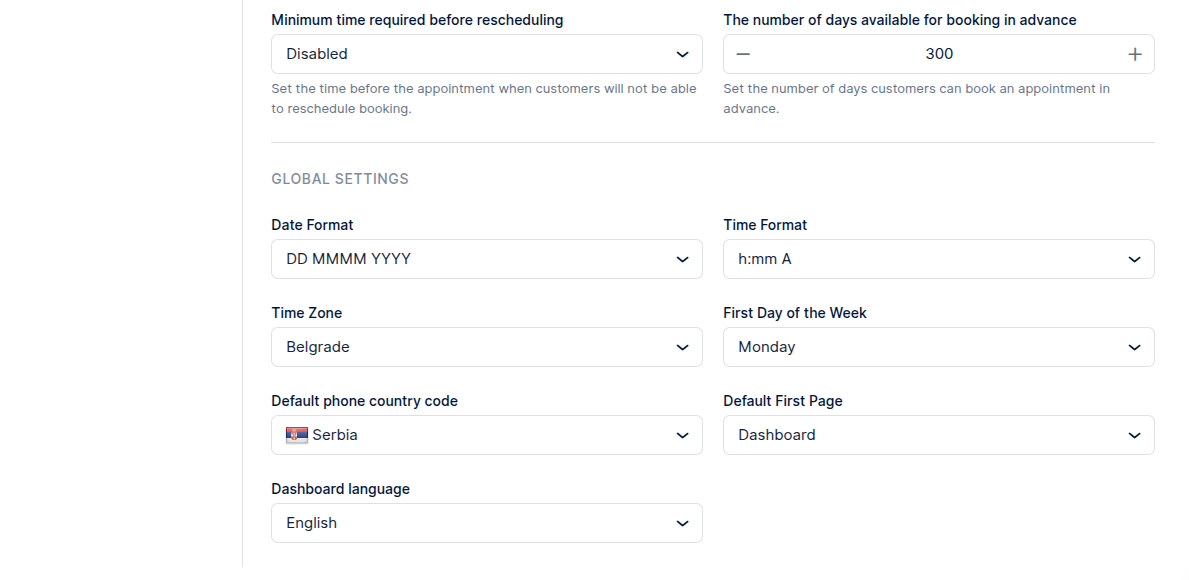
Appointment Settings
In the Appointment Settings section, you’ll find essential configurations for managing time slots and appointments within Trafft.
Default Time Slot Step
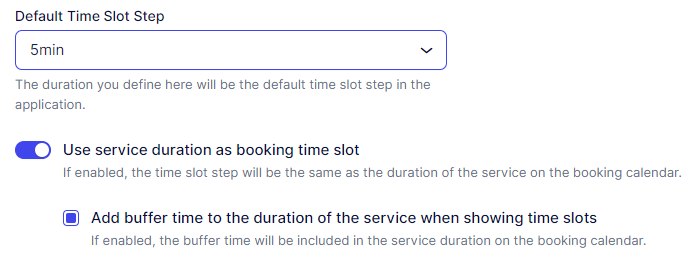
- Default Time Slot Step: This setting determines the time increment used throughout the application for various durations, including employee working hours, special days, service durations, and buffer times. By default, it is set to 30 minutes, but you have the flexibility to adjust it according to your needs.It’s crucial to note that all durations in Trafft must be divisible by this number. For example, if you want to offer a service lasting 2 hours with buffer times of 5 minutes, the Default Time Slot Step should be set to “5 minutes”.
- Use service duration as booking time slot: This option impacts how time slots are displayed to your customers:
- Disabled: With this option disabled, the Default Time Slot Step will determine the available booking increments. For instance, if your default time slot step is set to 5 minutes and your service lasts 1 hour, offered time slots will be 09:00 – 10:00; 09:05 – 10:05; 09:10 – 10:10, and so forth. When a customer books an appointment, the service duration will block surrounding time slots. For example, if a customer books an appointment at 09:55, the slots before and after this time will be blocked due to the 1-hour service.
- Enabled: When this option is enabled, the duration of the appointment (service duration + extra durations) will determine the available time slots. For example, if the service lasts 1 hour and an extra 30 minutes, the appointment duration will be 1.5 hours. Assuming the employee works from 09:00 – 17:00, the offered time slots will be from 09:00 – 10:30, then 10:30 – 12:00, and so forth.
- Enabling this option also allows you to utilize the “Add buffer time to the duration of the service when showing time slots” setting. This feature adds configured buffer times to the appointment duration. For instance, with a 30-minute buffer time added to the previous example, the appointment duration would be 2 hours instead of 1.5. Consequently, offered time slots would be from 09:00 – 11:00, then 11:00 – 13:00, and so forth.
Status and Time Limitations
The following options will apply to all appointments in Trafft. However, please note that “Minimum Time Required Before Booking” and “Number of Days Available for Booking in Advance” can also be configured per service. If these two options are configured differently within Service Settings, they will override the global settings configured here.
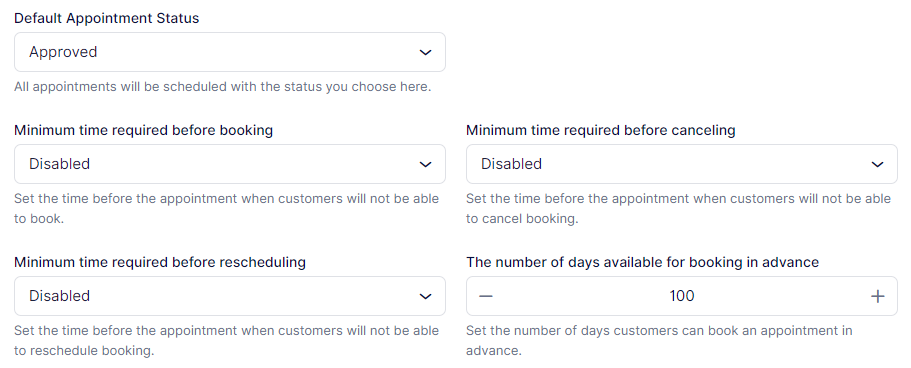
The following options will apply to all appointments in Trafft. However, please note that “Minimum Time Required Before Booking” and “Number of Days Available for Booking in Advance” can also be configured per service. If these two options are configured differently within Service Settings, they will override the global settings configured here.
- Default Appointment Status: This setting determines the initial status of all appointments when scheduled. By default, it is set to Approved, meaning all appointments will be made with the approved status. When email/SMS/WhatsApp notifications are configured, this status will automatically trigger the “Appointment Approved” notification for both customers and employees. Changing the status to Pending will require all appointments to be manually approved by the site admin/superadmin or the assigned employee.
- Please note that even if the default status is set to “Approved,” Group Appointments with a minimum capacity set above “1” will initially be in the “Pending” status until the minimum capacity is reached. Once the minimum capacity is reached, the status will automatically update to “Approved.”
- Minimum Time Required Before Booking: You can configure a minimum time before the appointment during which customers will not be able to book. For example, setting it to “1 day” means customers cannot schedule an appointment within the next 24 hours (from when they view the Booking Website). By default, this is set to Disabled, allowing customers to book appointments at any time, even 5 minutes before the scheduled start.
- Minimum Time Required Before Canceling allows you to set a minimum time before an appointment when customers cannot cancel. For instance, setting it to “2 hours” means customers cannot cancel an appointment within 2 hours before its start time. By default, this is set to Disabled, permitting customers to cancel at any time, even 5 minutes before the scheduled start.
- Minimum Time Required Before Rescheduling: Similar to canceling, you may want to prevent customers from rescheduling on short notice. This option sets a time before an appointment when rescheduling is not allowed. Setting it to “1 hour,” for example, means customers cannot reschedule an appointment scheduled to start within the next hour. By default, this is set to Disabled, allowing customers to reschedule at any time, even 5 minutes before the scheduled start.
- Period Available for Booking in Advance: This setting determines the number of days in the future when customers can book appointments. The default is set to 100 days. If you prefer to limit how far in advance customers can book, simply adjust this number to fit your needs.
Global Settings
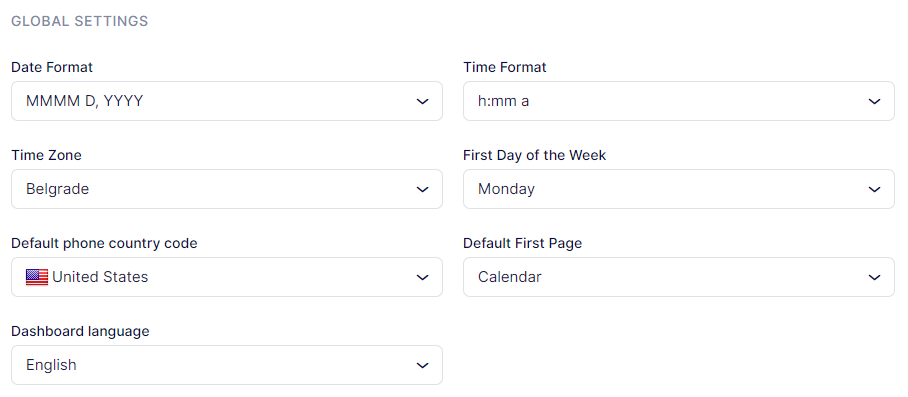
These settings cover the formats you’re familiar with, the time zone of your business, and some aspects of the backend view:
- Date Format: Choose from various date formats used worldwide. Select the format that best suits you and your customers.
- Time Format: Similar to the date format, Trafft provides options to configure how time is displayed. Choose between a 12-hour format or a 24-hour format.
- Time Zone: Select the time zone for your business operations. This time zone will be applied to all your employees unless they are in a different time zone. Both you and your employees can change this through their Employee panel. Setting the time zone ensures the correct display of booking times for businesses operating in a single time zone.Your customers will see time slots in their local time zone. However, the display is configured in the Customize section. Please visit that page to learn more about how customers view booking time slots.
- First Day of Week: Configure the first working day of the week. By default, it is set to Monday, but you can easily select any day of the week. Changing this setting will adjust the calendar to display the chosen day as the first day of the week.
- Default Phone Country Code: Set the default phone country code used in your country. This chosen code will be applied throughout the application.
- Default First Page: Choose the initial page you’ll land on when accessing the admin section. The default is set to “Calendar,” but you can change it to either “Dashboard” or “Appointments” based on your preference.
- Dashboard Language: Currently, besides English, the dashboard is available in Brazilian Portuguese, Czech, German, French, Italian, Dutch, Russian, Spanish, Serbian, Swedish and Thai. Once translations for other languages are complete, we will implement them as well. If you wish to contribute to Trafft’s translations, please email our support team at [email protected].
Have more questions?
If you face an issue, and cannot find an answer in the documentation, feel free to submit a support ticket!


